Last Season, Fortnite had a set of weekly quests that were released every Tuesday called the Resistance quests. And this time around it's no different, although they've been given a new and more season-appropriate name: Vibin' quests.
These quests will also be released every two Tuesdays at 9 AM ET. They'll require you to establish a device uplink as well, and you'll receive 7,000 XP for each stage you complete and 36,000 XP for each part you complete. We will update this guide as soon as more Vibin' challenges are released.
Updated September 6, 2022: We've updated this article to include the latest weekly quests and explain how to complete each one.
Part One
how to make doors in fortnite
During this first week of Vibin' quests, you'll receive the first three parts of your mission. More will eventually unlock after two weeks, but you'll have to complete all of these quests first before you can move on to the next part. You'll start off with a party near the Rave Cave and move on from there.
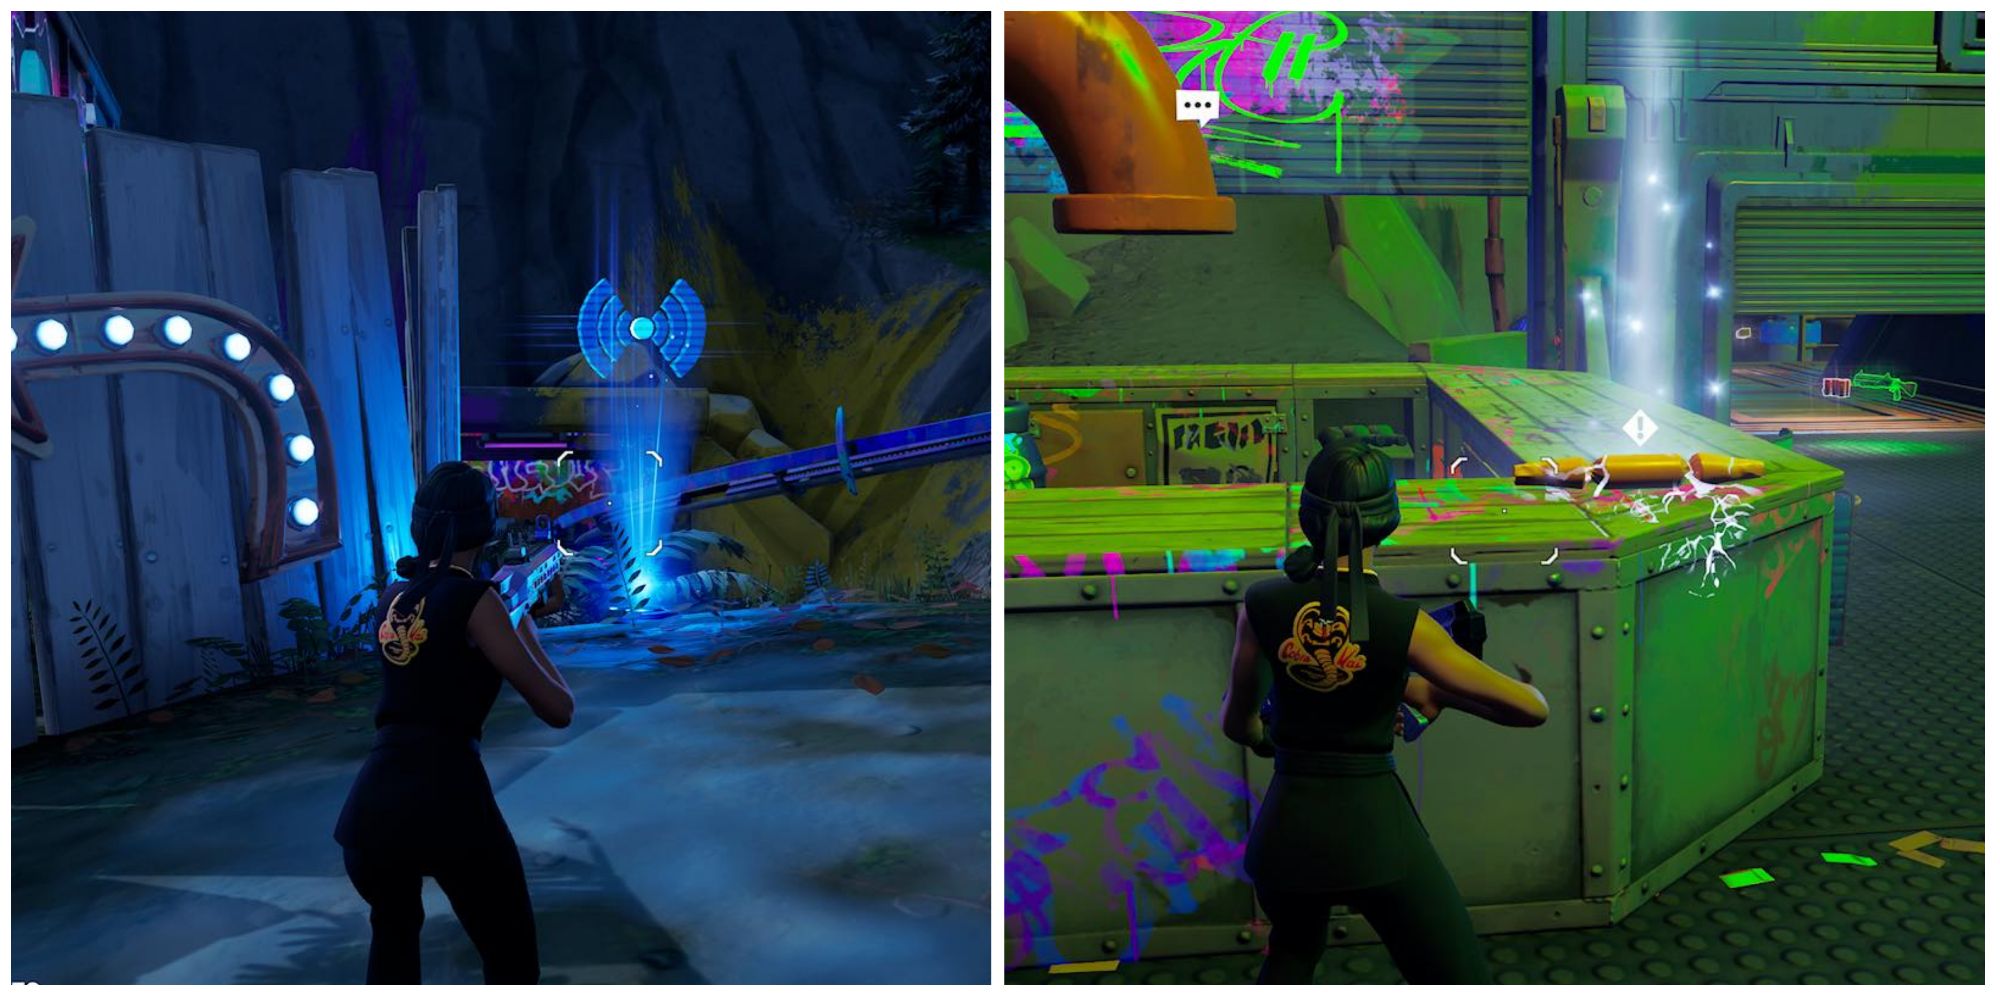
- Establish Device Uplink (Rave Cave)
- Collect food consumables for the party! (6)
Gather six consumables to move on to the next part. Anything from wildlife meat to Reality Sapling mushrooms and produce box vegetables will work, as long as you can consume it.
- Interact with the party poppers in the Rave Cave (5)
There are tons of party poppers in the Rave Cave. They'll appear on your screen as a quest mark, once you approach them the "pop!" interaction will appear.
- Establish Device Uplink (Sanctuary, Rocky Reels)
- Destroy objects at old IO Outposts (10)
Loopers are complaining that there is old IO trash everywhere. Go to old IO Outposts and destroy anything you can see using your pickaxe, or you can even use a vehicle to do this much faster.
- Spray peace sprays on structures at old IO Outposts (3)
You will have to spray three peace signs on structures at old IO Outposts but don't worry you won't have to go running around the map. You spray three signs at the same Outposts. To find the spray, open the emote wheel, and it'll appear on the Special tab. You will also be allowed to keep it once you finish the quest.
Part Two
- Establish Device Uplink (Reality Falls)
- Collect a Reality Seed from a Reality Seed Pod
- Take a Reality Seed to three named locations (3)
After collecting the Reality Seed from a Reality Seed Pod, you will have to take it with you to three different POIs, so don't plant it or transplant it straight away.
- Plant or transplant a Reality Seed
- Establish Device Uplink (Reality Falls)
- Scan the Reality Tree
Next to the lodge in Reality Falls, you will see a device that you can interact with if you approach it. Get close to it and then press the "scan Reality Tree network" button that will appear on your screen.
- Scan the root between the Reality Tree and the Reality Bloom
The root is located near the Rave Cave, just northeast of it and southwest of Logjam Lotus. If you check out your quests tab you will see it marked on your map with a quest marker. You'll have to go there and scan it. It's right in front of a giant piece of trunk coming out of the ground.
- Scan the Reality Bloom
Now, you'll have to visit Logjam Lotus in order to scan the Reality Bloom.
- Establish Device Uplink (Logjam Lotus, Shifty Shaft, or Rave Cave)
- Harvest fruit from Reality Saplings
You can harvest fruit from any Reality Sapling, not necessarily only from your sapling so don't worry if you're not near it. As soon as you see a Reality Sapling, gather its fruit to continue with the quests.
- Establish Device Uplink (Tilted Towers, Shifty Shafts, Sleepy Sound)
- Acquire bushranger seed from mysterious bloom
- Bring bushranger to Reality Tree
You can acquire the bushranger seed directly west of Coney Crossroads next to loot lake. It's a red flower. You'll have to acquire it and bring it to the Reality Tree, so you'll have to do this in one go because if you're unsuccessful you'll have to go and get the bushranger seed again and try once more. When you arrive, you'll see a pot where you can place the seed.
- Establish Device Uplink (Reality Falls, Tilted Towers, Loot Lake)
- Interact with Zero Point Scanning devices (3)
There are Zero Point scanning devices scattered all over reality Falls and Loot Lake across the water, you'll have to gather Zero Point data across highlighted water areas marked on your screen once you reach the location.
Part Three
- Establish Device Uplink (Greasy Grove, The Joneses, Coney Crossroads, Logjam Lotus)
- Damage opponents using a Star Wars Weapon (500)
There are only five Imperial Docking Bays, which is exactly where you'll have to go to get a Star Wars weapon. Each docking bay has a certain number of chests that can spawn, and you'll have to loot them to get the gun. There's a docking bay between Seven Outpost II and Logjam Lotus, one just north of the Shell or High Water maze, another one on the Dirt-Cut Circuit, south of Coney Crossroads, and one on the Perch, east of the Joneses.
- Establish Device Uplink (Greasy Grove, The Joneses, Coney Crossroads, Logjam Lotus)
- Plant listening Devices at Imperial Docking Bays (3)
- Establish Device Uplink (Greasy Grove, The Joneses, Coney Crossroads, Logjam Lotus)
- Defeat Darth Vader
Lastly, you'll have to defeat Darth Vader. He is considered a boss, so he can be very difficult to defeat if you go in unprepared. To find Darth Vader you'll have to see where his airship lands at the start of the match when it flies by the Battle Bus at the start of the match. And, once the airship lands it'll also emit a very visible glow that can be seen from a distance.
After you've gathered enough materials, shields, and weapons, go and attack him as best as you can. He will use his lightsaber to block your bullets so use them wisely.
Part Four
- Establish Device Uplink (Reality Falls, Greasy Grove)
- Visit Beach Bash where the Sith Holocron washed up
- Investigate clues to the whereabouts of the Sith Holocron (3)
Beach Bash is just west of Reality Falls and Greasy Grove. Head there after establishing the Device Uplink. There you'll see various items scattered on the shore, approach them and press the 'investigate clues' button.
- Establish Device Uplink (Logjam Lotus)
- Collect an anomaly from both Logjam Lotus and Butter Bloom (2)
You will have to visit Logjam Lotus and Butter Bloom and collect an anomaly in each of the locations. When you get close to the locations, a quest marker will appear on your screen. Follow the marker, and you'll see the anomaly you need to collect. You don't have to collect both anomalies in the same match, so don't worry about hurrying to the second location.
- Establish Device Uplink (Synapse Station)
- Collect a tracking device from Synapse Station
- Dumpster dive for fake relic materials
After getting the tracking device from Synapse Station, head down to Tilted Towers and find a dumpster to hide in.
- Construct a fake relic at Sleepy Shrubs
- Establish Device Uplink (Rave Cave)
- Locate where the Sith Holocron is being held in Rave Cave
- Pry open shipping boxes to find the Sith Holocron
There's a building just as you enter through the southern entrance of the Rave Cave — it's usually where Cryptic hangs out. On the ground floor, you will see two slightly open garage doors, go inside, and you'll find tons of shipping boxes. Destroy them with your pickaxe until you find the Sith Holocron.
Part Five
- Establish Device Uplink (Shuffled Shrines)
- Dig up dirt piles to find the Relic Shard
- Attune the Relic Shard (Arid Acres)
There are several Relic Shards in Shuffled Shrines, you'll have to dig them up (hit them with your pickaxe) until a Relic Shard pops out. Then, you'll have to visit Arid Acres to attune it — build up to the plateau to do it.
- Establish Device Uplink (Butter Bloom, Shuffled Shrines)
- Block the pipes to build pressure (3)
- Unclog the main pipe to free the Relic Shard
- Collect the Relic Shard
- Attune the Relic Shard (Mighty Monument)
There are three pipes that you'll have to block in Shuffled Shrines in order to build up pressure. Then, once you're done, unclog the large pipe in the center of the smaller pipes. This will cause the Relic Shard to pop out so you can collect it. After you've grabbed it, go to Mighty Monument to attune it.
- Establish Device Uplink (Paradoxical Ruins, Sanctuary, Shuffle Shrines)
- Align the three mirrors
- Collect the Relic Shard
- Attune the Relic Shard (Sanctuary)
There are three mirrors that you'll have to align in Shuffle Shrines for this riddle (their location appears as quest markers on your map). Interact with each mirror once to make the Relic pop out of the wall so that you can collect it and attune it on top of the large hill with the boulder at Sanctuary.
- Establish Device Uplink (Paradoxical Ruins, Sanctuary, Shuffle Shrines)
- Enter the main chamber at Shuffle Shrines
- Combine the Relic Shards
This is the hardest part of these quests as of now. You'll have to enter the main chamber at Shuffle Shrines, which means you'll have to solve the riddle. Check out our Indiana Jones guide to learn how to do it in no time. Once you're in, turn left and enter a small room through the crack on the wall then press the "combine Relic Shard" button.
Part Six
- Establish Device Uplink (The Joneses, Condo Canyon, Chonker's Speedway)
- Find the Chair
To find the Chair, head to Seven Outpost IV, southeast of Chonker's Speedway. As you approach this location, you'll notice a small red chair. Go up to it and select the 'extract' option.
- Establish Device Uplink (The Joneses, Greasy Grove, Coney Crossroads, Logjam Lotus)
- Travel while sprinting (500)
- Consume foraged items (6)
- Travel distance while swimming (500)
For this second stage of these quests, you'll have to go on a sort of triathlon, where you'll have to sprint, swim and consume some forageable items.
- Establish Device Uplink (The Joneses, Condo Canyon, Chonker's Speedway)
- Break the energy field around The Chair
- Collect The Chair
After establishing a Device Uplink, you'll have to go and interact with The Chair again, this time twice. First, you'll have to break its energy field by hitting the purple glowing sphere around it. Then, collect it by interacting with it again. Be careful near this area, since sometimes players will camp in hiding spots to farm eliminations.
Part Seven
- Establish Device Uplink (Sanctuary)
- Collect the Foundation's launch records at Sanctuary (2)
- Report to the Foundation at Mighty Monument
- Find a clue for the Foundation's whereabouts
As soon as you reach Mighty Monument, you will automatically report to the Foundation, so next you'll have to find a clue. It's right under the giant statue, so you shouldn't have any trouble locating it. All clues this week are quite easy to find, as long as you check out their markers.
- Establish Device Uplink (Condo Canyon)
- Find the Visitor
- Collect surveillance footage from cameras at Bungalow Blooms (3)
Now, you're going to collect surveillance footage from three different cameras at Bungalow Blooms. They're marked on your map, and not too far away from each other, so as long as you keep it quiet, you'll get through it in no time.
- Establish Device Uplink (Rave Cave)
- Dance on the main dance floor at Rave Cave for five seconds
- Restore health or shields by destroying Slurp Barrels in Rave Cave (30)
Each Slurp Barrel will heal you by ten HP or ten Shield, and you'll only have to destroy three barrels to complete this quest. They're scattered all over Rave Cave since it's a party location, and it's what characters on the island drink.
- Find a clue for the Imagined's whereabouts
- Establish Device Uplink (Rave Cave, Reality Falls)
- Talk to Seven Sentry Sven
Seven Sentry Sven wanders around Seven Outpost V, southwest of the Rave Cave. Head down there and talk to him about what is going on with the Order.
- Talk to Seven Sentry Svenja
Since Sven hasn't seen the Order in weeks — you're going to have to find another sentry that might've seen her. Go to Seven Outpost VII, east of Sanctuary to try and learn more.
- Find a clue for the Order's whereabouts (Lazy Lagoon)
Head down to Lazy Lagoon to find the final clue to where the Order might be. Unfortunately, you'll have to wait two weeks until the next part of the Vibin' quests are released, and then you can find out what has happened.
Part Eight
- Establish Device Uplink (Shifty Shafts, Coney Crossroads, Tilted Towers)
- Find The Seven comm device (Loot Lake)
- Swim through energy clouds to charge the energy cell (10)
- Plug the energy cell back into The Seven comm device
You'll need to head to Loot Lake right after you've established the Device Uplink, so that you can interact with The Seven comm device. Unfortunately, you'll find out soon enough that it's dead and needs to be recharged. Therefore, it's your duty to swim around Loot Lake and collect a total of ten energy clouds and then plug the cell back into the comm device.
- Establish Device Uplink (Sleepy Sound, Sanctuary)
- Visit Coney Crossroads
- Visit Lazy Lagoon
- Collect The Origin Helmet at Seven Outpost III
For this next phase, you'll have to visit a couple of different places on the map, so you might want to get yourself a Nimbus Cloud to get this done a lot faster. Visit Coney Crossroads, then head up to Lazy Lagoon, and lastly visit the northeastern corner of the map to get The Origin Helmet at Seven Outpost III.
NEXT: Fortnite: All Snap Quest Locations